VDI For Fun and Profit
I've had a goal for a while. To successfully network boot an arbitrary computer and have it automatically have authenticated access to usable VMs hosted on my cluster.
To do this, there are three real moving parts: a properly configured PXE server, the OS the PXE server boots to, and the VM infrastructure behind it all.
All this assumes your cluster runs Proxmox and your DHCP server is dnsmasq. DHCP is probably easy enough to work around, but you're on your own with jails, esxi, Hyper-V, or for the truly masochistic, VirtualBox.
The DHCP Server
My DHCP Server is based on dnsmasq. I've added the following configuration:
dhcp-vendorclass=BIOS,PXEClient:Arch:00000
dhcp-vendorclass=UEFI32,PXEClient:Arch:00002
dhcp-vendorclass=UEFI32-1,PXEClient:Arch:00006
dhcp-vendorclass=UEFI,PXEClient:Arch:00007
dhcp-vendorclass=UEFI64,PXEClient:Arch:00008
dhcp-vendorclass=UEFI64-1,PXEClient:Arch:00009
dhcp-boot=tag:BIOS,ipxe/undionly.kpxe,$TFTPd_FQDN,$TFTPd_IP
dhcp-boot=net:UEFI,ipxe/ipxe.efi,$TFTPd_FQDN,$TFTPd_IP
dhcp-boot=net:UEFI32,ipxe/ipxe.efi,$TFTPd_FQDN,$TFTPd_IP
dhcp-boot=net:UEFI32-1,ipxe/ipxe.efi,$TFTPd_FQDN,$TFTPd_IP
dhcp-boot=net:UEFI64,ipxe/ipxe.efi,$TFTPd_FQDN,$TFTPd_IP
dhcp-boot=net:UEFI64-1,ipxe/ipxe.efi,$TFTPd_FQDN,$TFTPd_IP
dhcp-boot=tag:ENH,ipxe/menu.ipxe,$TFTPd_FQDN,$TFTPd_IP
dhcp-userclass=set:ENH,iPXE
dhcp-match=set:ENH,175
There's a lot here, but its mostly repetitive.
dhcp-vendorclass= simply creates a tag with the name you define. They can be anything! The second part Arch:0000whatever simply refers to the type of BIOS/UEFI implementation the PXE server will receive.
I GUESS you could do some uboot magic here, but I've not done it.
You can ALSO shove all these under a specific VLAN tag to create different PXE boot environments per VLAN. dnsmasq is flexible like that.
The NFS Server
NFS is fairly straightforward. Install the nfs-server package or your distribution's equivalent. There's a thousand good guides on setting a server up, but the key part they leave out is the options for the actual export in /etc/exports/.
You want to include (rw,no_root_squash,no_subtree_check) after the path to your desired NFS root. Otherwise, you're going to end up with strange boot issues.
The PXE server
I'm using iPXE, and tftpd-hpa.
Configure tftpd-hpa to look like this:
TFTP_USERNAME="tftp"
TFTP_DIRECTORY="/foo/bar/tftpd/stuff/"
TFTP_ADDRESS="0.0.0.0:69"
TFTP_OPTIONS="-4 --secure -vvv"
/foo/bar/tftpd/stuff is where you'll be putting the iPXE folder, which contains:
initramfs-linux.img  #Your netboot initramfs
ipxe.efi
ipxe.lkrn
menu.ipxe            #The boot menu you see.
undionly.kpxe
vmlinuz-linux        #Your netboot kernel
You can get almost all the files here: https://boot.ipxe.org/
You'll need to edit menu.ipxe and add an entry like this:
item ipxe-vdi-client      Boot PXE VDI Client

:ipxe-vdi-client
# See http://manpages.ubuntu.com/manpages/precise/man7/caspe>
echo Booting iPXE VDI ${archl} for ${initiator-iqn}
kernel vmlinuz-linux
initrd initramfs-linux.img
imgargs vmlinuz-linux root=/dev/nfs netboot=nfs rootfstype=nfs nfsroot=$NFS_IP:/$NFSROOT,tcp locale=en_US.UTF-8 ip=::::::dhcp debug loglevel=7 net.ifnames=0 initrd=initramfs-linux.img
shell
boot || goto failed
goto start
Depending on what distribution you use, your vmlinuz-linux and initramfs-linux.img may be named differently.
There are a few important things in this entry I want to point out:
root=/dev/nfs   #Create virtual device /dev/nfs for nfsroot
ip=::::::dhcp 	#Pull a DHCP address on all available network interfaces.
net.ifnames=0   #Do not rename interfaces from eth0
nfsroot=$NFS_IP:/$NFSROOT,tcp
nfsroot=$NFS_IP:/$NFSROOT,tcp deserves its own explanation.
$NFS_IP is static IP you've defined for your NFS server. It MUST be static.
$NFSROOT is the path you defined in your /etc/exports pointing towards the folder containing the root filesystem.
The NFS Root
This part is shockingly easy, but how your distribution handles everything will vary. I use Archlinux (btw), so these will be Archlinux specific instructions.
- Create a VM on your Proxmox installation. You don't need a lot of space since this will only exist to drop you into the VDI client. 8GB should be more than enough. Use whatever settings you like. It doesn't matter.
- Install Archlinux using the installer. When it comes to partitioning, shove everything under one partition. Don't forget to add a non-root user, I'll be using the user
brandy. - Reboot into your Archlinux VM
- Install the following packages:
linux-firmware mkinitcpio-nfs-utils nfs-utils git virt-viewer python3-pip - Follow the instructions here: Why? Because
nfsmountdoesn't support NFSv4 because of this bug. Its upstream of most distributions, so when the fix comes, this step won't be necessary - You remember where you put
nfsv4in theMODULESsection of/etc/mkinitcpio.conf? You're ALSO going to want to put the network modules in there. In the case of the laptop I'm writing this on, I'll adde1000efor the Intel Driver specific to my NIC. You can find out which you need by booting a Live Installation (maybe from that nice iPXE menu), and runninglspci -vv. Then find your NIC, and the "Kernel driver in use" will be your module name. - Rebuild your initramfs with
mkinitcpio -Pand copyinitramfs-linux.imgandvmlinuz-linuxto the/foo/bar/tftpd/stufflocation used in The PXE Server section. - Mount your NFS folder, as defined by
$NFS_IP:/$NFSROOTearlier to/mnt. - Run as root,
cp -ax / /mnt/. That should copy your root filesystem, symlinks, permissions, and all to the NFS server. - Don't delete this VM, its handy for troubleshooting and shouldn't take up much space.
The First Remote Boot
- Create a blank VM in Proxmox. Yea, I know you probably don't want to, but this is just for testing. You don't need a hard disk so this thing should take up like 100KB.
- Set it to boot from the network.
- Hit start. You SHOULD see your blue and white iPXE menu.
- Navigate to whatever you named your entry to like 3 pages ago (god help you if you're doing this on mobile)
- You should be staring at a login prompt.

Not having brandy? Best pour yourself a glass anyways. You probably have some cryptic messages and a long night of googling ahead. If you're clever, you can find me and I might be able to help. No guarantees sadly, the brandy giveth, and the brandy taketh away.
The Desktop Environment
Since we're not actually doing anything wild here graphics wise, we aim for lightweight and quick to load. That's LXDE.
- Install LXDE. For Archlinux thats
pacman -Syu lxde. - Autologin as user. NOTE: THIS IS TERRIBLE SECURITY UNLESS THE USER IS SEVERELY RESTRICTED. YOU'VE BEEN WARNED.
- Edit
/etc/lxdm/lxdm.confto include your now limited user on the autologin line under[base]. Should look something like this:autologin=brandy. - The final steps are going to be setting up the VDI client, disabling the rest of the desktop environment except the VDI client, and basking in our own magnificence.
The VDI Client
The VDI client I use is this nifty repo: https://github.com/joshpatten/PVE-VDIClient.
- A quick reboot from the last step (The Desktop Environment) should drop you into the GUI. From there open the terminal. I don't remember what its called.
- Follow below:
git clone https://github.com/joshpatten/PVE-VDIClient.git
cd ./PVE-VDIClient/
chmod +x requirements.sh
./requirements.sh
cp vdiclient.py /usr/local/bin
chmod +x /usr/local/bin/vdiclient.py
mkdir /etc/vdiclient/
3. Create/edit your /etc/vdiclient/vdiclient.ini to the following:
[General]
title = VDI Login
theme = LightBlue
icon = vdiicon.ico
logo = vdiclient.png
kiosk = False
fullscreen = True
inidebug = False
guest_type = both

[Authentication]
auth_backend = fqdn.tld
auth_totp = false
tls_verify = false

[Hosts]
prox.mox.ip.address:8006

[SpiceProxyRedirect]
prox.mox.ip.address:3128 = prox.mox.ip.address:3128
Notes: the only things that are important are the auth_backend and the entries under [Hosts] and [SpiceProxyRedirect]. auth_backend should match the Realm you intend on using in Proxmox (see next section).
4. Create a file /home/brandy/thinclient with the contents:
while true
do
	/bin/python3	/usr/local/bin/vdiclient.py
done
5. chmod +x /home/brandy/thinclient
6. Test the file with sh /home/brandy/thinclient. This should launch your VDI window and relaunch it if you close it.
7. Create a file /home/brandy/.config/lxsession/LXDE/autostart with the only contents being @/usr/bin/bash /home/brandy/thinclient
8. Reboot one last time, and you should be staring at a black screen with just your VDI client running in the background. You should test the login at this time and make sure it works.
Proxmox LDAP Configuration
You can do all this with the internal Proxmox user/groups, but what's the point of doing all that when you have an LDAP server sitting RIGHT THERE ->.
Start by logging into your Proxomx server. Then navigate to Permissions -> Realms.
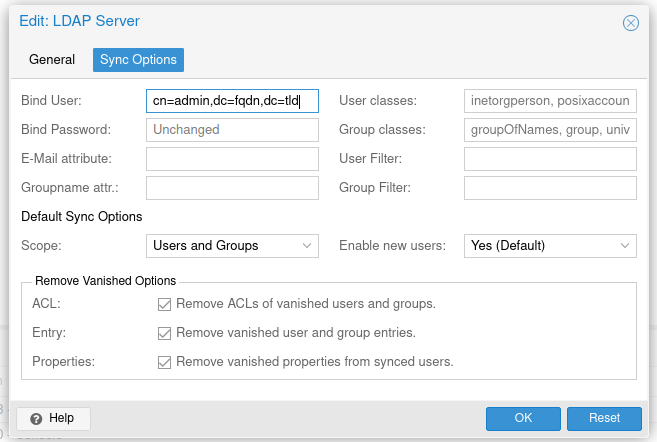
Click "Add" -> LDAP Server and fill out the form like this.
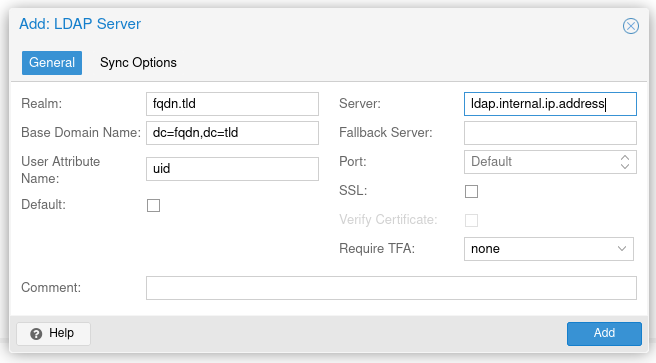
Your users should automatically propogate to the domain.
Enabling the VDI Users
For this section, we'll select/create/whatever VMs/LXCs we want our VDI users to use. This will all be done through the Proxmox webui.
- Create a pool by going to
Datacenter -> Permissions -> Pools - Go to that pool (should be on the left side towards the bottom).
- Click Add, and select the VMs you want to log in to.
- Create a group by going to
Datacenter -> Permissions -> Groups -> Create - Name the group
VDIUsers. Click OK - Go to
Datacenter -> Permissions -> Users - Select the username you want to log in with, click
Edit. - In the group dropdown menu, select
VDIUsersin addition to whatever groups were already there. - Go to
Datacenter -> Permissions - Click
Add -> Group Permission - For
PathselectPool/$POOL_NAME - For
GroupselectVDIUsers - For
RoleselectAdministrator - For bonus points, you can create a custom VDI Role under
Datacenter -> Permissions -> Roleswith the permissions you want instead.
Common After Problems
- New computer doesn't boot iPXE: Probably need a new entry of some sort in your
dnsmasq.conf. See the big ass code block in "The PXE Server" - New computer boots iPXE, but not doesn't mount NFS root: Probably missing a network driver. Go back to "The NFS Root" and follow steps 6-8. You don't need to re-copy the root filesystem.
- Something else: Who the hell knows man, I'm lucky I got this to work at all.
- Is there a better way? : Probably, check this video out: https://www.youtube.com/watch?v=r-TnP06K-gE